| images | ||
| auth-request.lua | ||
| haproxy-lua-http.lua | ||
| json.lua | ||
| README.md | ||
This documentation aims to outline the steps I did to get Authentik working via HAProxy on pfSense.
Step 1 - Download Required Files
This repo contains a copy of the lua files that are needed to be imported on pfSense to get HAProxy working. I also included links to to original repos in the table below where I got these files from in case you may want to get them from the source.
| Name | Type | content |
|---|---|---|
| json.lua | Lua script | copied from https://github.com/rxi/json.lua |
| haproxy-lua-http.lua | Write to disk | copied from https://github.com/haproxytech/haproxy-lua-http |
| auth-request.lua | Lua script | copied from https://github.com/TimWolla/haproxy-auth-request/blob/main/auth-request.lua |
Step 2 - Setup Authentik
To get started logon to your docker host and download the official docker compose file using the following command
wget https://goauthentik.io/docker-compose.yml
You will need to create a media, certs, and custom-templates folder to hold your Authentik data.
mkdir media certs custom-templates
You will now need to generate a secret key for Authentik and a password for postgres and store them in a .env file. To do so run the following commands
echo "PG_PASS=$(openssl rand -base64 36 | tr -d '\n')" >> .env
echo "AUTHENTIK_SECRET_KEY=$(openssl rand -base64 60 | tr -d '\n')" >> .env
Now you just need to run the containers. Do so by running the following command
docker compose up -d
After Authentik is running, browse to https://[ip-of-docker-host]:[authentik-https-port]/if/flow/initial-setup/ (In my case it would be https://192.168.50.10:9444/if/flow/initial-setup/). You should be presented with a page to setup user email and password.

Enter a email and a strong password and then click Continue and you should be logged in to Authentik
Configure Authentik Outpost, Provider and Application
Now that you setup Authentik and is logged in we will need to setup a Provider and an Application to handle Forward Auth requests.
The first is to setup a new Provider for Forward Auth (Domain Level). In Authentik go to Applications -> Providers and create a new Provider. Select Proxy Provider and click Next to continue.
 On the next screen give the provider a name and set Authentication Flow to ...explicit-consent... Make sure
 Forward auth (domain level) is selected and enter the Authentication URL and Cookie domain.
The Authentication URL is the proxy URL that you will use to access Authentik via HAProxy and the Cookie domain is your root domain.
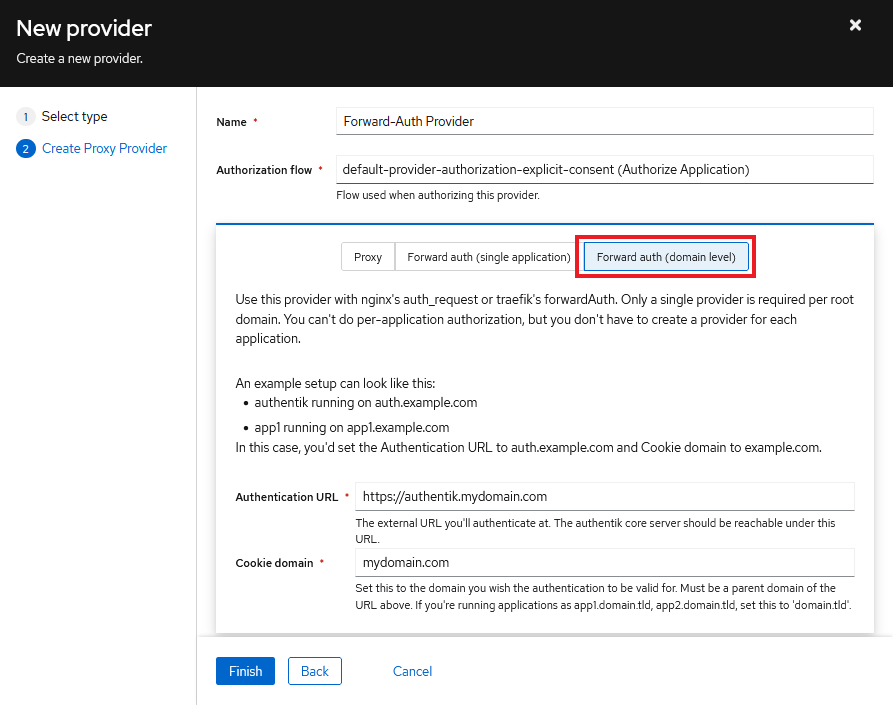
Now scroll down to the Advanced flow settings section and make sure Authentication flow and Invalidation flow are set. I am using the defaults here.

Next is to setup a new Application. In Authentik go to Applications -> Applications and create a new Application.
Give the application a name and slug and make sure to set the provider for the application to the one you just created

Next is to set the embedded outpost to use the Forward Auth Provider you created. In Authentik go to Applications -> Outposts and you should see the default embedded outpost

Edit the embedded outpost and make sure to copy the Forward Auth Application you created earlier over to the Selected Applicaatios box. Also expand the Advanced settings section and for authentik_host you want to put the proxy URL that you will use to access Authentik over HAProxy. This should be the same URL you entered as the Authentication URL in the provider.

And that should be it for setting up your Authentik instance. We will now move over to pfSense and getting HAProxy setup in the coming steps.
Step 3 - Install and configure HAproxy
On pfSense go to System -> Package Manager -> Available Packages and Search for haproxy. You will most likely see 2 haproxy packages, a haproxy-devel and the standard haproxy package. Install the standard haproxy package
Uploading lua files to pfSense
To Import the files on pfSense, go to Diagnostics -> Command Prompt and use the Upload File section to upload the 3 lua files. The files will be uploaded to the /tmp/ directory on pfSense.
Now you need to copy/move the files to the /usr/local/share/lua/5.3 folder so HAProxy will be able to load those files. Again, on the Diagnostics -> Command Prompt screen, you need to use the Execute Shell Command section to copy the files from the /tmp/ directory to the /usr/local/share/lua/5.3 directory. Do so by executing the following shell commands:
cp /tmp/json.lua /usr/local/share/lua/5.3/json.lua
cp /tmp/haproxy-lua-http.lua /usr/local/share/lua/5.3/haproxy-lua-http.lua
cp /tmp/auth-request.lua /usr/local/share/lua/5.3/auth-request.lua
Configure HAProxy to use the lua files
Go to Services -> HAProxy and under the Files tab add the 3 lua files. When adding the files, you will need to copy all the contents of the files you are adding and paste it in the content section on pfSense. Use the image below as reference:

After adding the files, save and apply config, you should NOT get any errors. If you get any errors or warnings then something went wrong so recheck everything you did up to this point.
Step 4 - Configure Backends
After successfully adding the required files from Step 3 above, you can start to configure the backends.
Setup Backend for Authentik
You need to setup a backend for Authentik. To do so, go to Services -> HAProxy -> Backend and add a backend.
For the backend I will simply name mine as authentik-http, feel free to name your backend whatever you want. This name will be relevant later on in the documentation so remember it. You will also need to populate the Address and Port fields with the IP address of your Authentik instance and the port for HTTP, then save. See image below for reference.
IMPORTANT: the port you are using for your Authentik backend MUST be the HTTP port... NOT HTTPS.

Setup backend you want to protect
In addition to setting up the backend for Authentik, you will also need to setup the backend/s for any service/s you want to protect.
For the sake of this tutorial lets say I have a service (snipe-it) that I want to protect. This service is running at 192.168.12.3 on http port 4000.
The backend setup is the same, give it a name and populate the Address and Port.

Now just save and apply config. You should NOT get any errors. If you get any errors or warnings then something went wrong so recheck everything you did up to this point.
Step 5 - Configure Frontend
Create Frontend And Set Listen IP and Port
Now you need to setup a frontend to tie everything together. To do so, go to Services -> HAProxy -> Frontend and add a frontend.
You can name the frontend whatever you want, the important thing is to set the Listen Address you want HAProxy to listen on and also the port you want it to listen on. See image below for reference:

Setting up Access Control Lists
In the front end you will need to setup the ACL below ensuring it is the first ACL in the list. This ACL will determine which backends are protected by authentik based on the url.
acl protected-frontends hdr(host) -m reg -i ^(?i)(service1|service2)\.yourdomain\.com
Based on the ACL above the backends at https://service1.yourdomain.com and https://service2.yourdomain.com will be protected by a authentik login prompt. You can add more services by just adding a | and adding the other service you want to protect. For example if you want to protect a service at https://service3.yourdomain.com then the ACL would be modified to be (service1|service2|service3)\.yourdomain\.com
See images below for reference:

Now setup the following ACLs as well.
acl is_authentikoutpost path -m reg ^/outpost.goauthentik.io/
Reference:

For each backend service you want to protect you will need to add an ACL for it, specifying the FQDN for that service. Example below
acl service1 hdr(host) -i service1.yourdomain.com
Reference:

You will also need to create an ACL for Authentik itself also and this one is important because whatever FQDN you use here should match the one set in Authentik. For mine, I have it set to authentik.mydomain.com.

When you are done setting up the ACLs, you should have something similar to mine shown below:

Setting up Actions
The actions controls what happens when a incoming request to the proxy matches any ACLs.
Scroll down to the Actions section and add the following actions:
http-request set-var(req.scheme) str(https) if { ssl_fc }
Reference

If the above action is not set then there will be a warning in Authentik that HTTPS is not detected correctly. See warning in image below:
 From my very short testing I did not see any noticeable impact to the functionality of Authentik when that warning was displayed, but I think it's worth pointing this out.
http-request set-var(req.scheme) str(http) if !{ ssl_fc }
Reference:

http-request set-var(req.questionmark) str(?) if { query -m found }
Reference:

http-request set-header X-Real-IP %[src]
Reference:


http-request set-header X-Forwarded-Method %[method]
Reference:


http-request set-header X-Forwarded-Proto %[var(req.scheme)]
Reference;


http-request set-header X-Forwarded-Host %[req.hdr(Host)]
Reference:


http-request set-header X-Original-URL %[url]
Reference:


http-request lua.auth-intercept authentik-http_ipvANY /outpost.goauthentik.io/auth/nginx HEAD x-original-url,x-real-ip,x-forwarded-host,x-forwarded-proto,user-agent,cookie,accept,x-forwarded-method x-authentik-username,x-authentik-uid,x-authentik-email,x-authentik-name,x-authentik-groups - if protected-frontends !is_authentikoutpost
Reference:

Make note of the authentik-http_ipvANY. This is the Authentik http backed created earlier in the documentation, pfSense automatically adds _ipvANY to all backend names in the HAProxy config. You should replace authentik-http with the name of your backend.
http-request redirect code 302 location /outpost.goauthentik.io/start?rd=%[hdr(X-Original-URL)] if protected-frontends !{ var(txn.auth_response_successful) -m bool } { var(txn.auth_response_code) -m int 401 } !is_authentikoutpost
Reference:

http-request deny deny_status 401 if protected-frontends !{ var(txn.auth_response_successful) -m bool } !is_authentikoutpost
Reference:

http-request redirect location %[var(txn.auth_response_location)] if protected-frontends !{ var(txn.auth_response_successful) -m bool } !is_authentikoutpost
Reference:

http-response set-header Strict-Transport-Security "max-age=63072000"
Reference:

use_backend authentik-http_ipvANY if protected-frontends is_authentikoutpost
Reference:

Now you should add actions for all the backends.

 NOTE: The names in the
 See below field should match the the names used when setting up the ACLs. So the names above should be the same as the name used when creating the ACLs below:

Now just save and apply config. You should NOT get any errors. If you get any errors or warnings then something went wrong so recheck everything you did up to this point.
Step 6 - Testing
That should be it. Now you just need to test. Browse to the URL of any of your services that you are protecting with the protected-frontends ACL and it should redirect you to Authentik for authentication before you get access to the service.
Please feel free to suggest changes or improvements or any ways that my implementation can be made better. All feedback are welcomed